Setting up CompactFlash
Overview
In order to get a bootable CompactFlash to work with, the the flow is
- Downloading the resources (if you haven’t done that already, please go back to the download page)
- Loading the CompactFlash with an image just downloaded
- Generating the bitstream to load the FPGA with (making an ACE file)
- Copying the ACE file to CompactFlash’ FAT16 partition.
This can be done with a Windows or Linux computer.
And let's say this again: Use a SanDisk CompactFlash, nothing else! Or your Linux system will appear to be unstable for no apparent reason.
Loading the image to flash (Windows)
Connect the CompactFlash to USB adapter with the card inserted. Windows users need an application to copy the image, such as the USB Image Tool which is free for download (it’s just a ZIP archive).
On some machines, the GUI will fail to run with an error saying the software initialization failed. In that case, the command line alternative can be used, or a Microsoft .NET framework component needs to be installed.
To do it with GUI, run “USB Image Tool.exe”. When the main window shows up, plug in the USB adapter, select the device icon which appears at the top left. Make sure that you’re in “Device Mode” (as opposed to “Volume Mode”) on the top left drop down menu. Click Restore and set the file type to “Compressed (gzip) image files”. Select the downloaded image file (xillybus.img.gz). The whole process should take less than a minute. When finished, unmount the device (”safely remove hardware”) and unplug it.
Alternatively, this can be done from the command line (which is a quick alternative if the attempt to run GUI fails). This is done in two stages. First, obtain the device’s number. On a DOS Window, change directory to where the application was unzipped to and go (typical session follows):
C:\usbimage>usbitcmd l

USB Image Tool 1.57
COPYRIGHT 2006-2010 Alexander Beug
http://www.alexpage.de

  Device   | Friendly Name             | Volume Name | Volume Path | Size
 ------------------------------------------------------------------------------
      2448 | USB Mass  Storage Device  |             | E:\         |   2014 MB
(That was the letter “l” as in “list” after "usbitcmd", not the figure “one”)
Now, when we have the device number, we can actually do the writing (”restore”):
C:\usbimage>usbitcmd r 2448 \path\to\xillybus.img.gz /d /g

USB Image Tool 1.57
COPYRIGHT 2006-2010 Alexander Beug
http://www.alexpage.de

Restoring backup to "USB Mass  Storage Device USB Device" (E:\)...ok
Again, this should take less than a minute. And of course, change the number 2448 to whatever device number you got in the first stage, and \path\to\ replaced with the path to where the flash image is stored on your computer.
Loading the image to flash (Linux)
Warning:
Raw copying to a USB device is a dangerous task: A trivial human error
(typically choosing the wrong destination disk) can result in
irrecoverable loss of the data of an entire hard disk. The distance between
the desired operation and a complete disaster is one character typed
wrong. Think before pressing Enter, and consider doing this in Windows if you're not used to Linux.
Sep  5 10:30:59 kernel: sd 1:0:0:0: [sdc] 7813120 512-byte logical blocks: (4.00 GB/3.72 GiB)
Sep  5 10:30:59 kernel: sd 1:0:0:0: [sdc] Write Protect is off
Sep  5 10:30:59 kernel: sd 1:0:0:0: [sdc] Assuming drive cache: write through
Sep  5 10:30:59 kernel: sd 1:0:0:0: [sdc] Assuming drive cache: write through
Sep  5 10:30:59 kernel:  sdc: sdc1
Sep  5 10:30:59 kernel: sd 1:0:0:0: [sdc] Assuming drive cache: write through
Sep  5 10:30:59 kernel: sd 1:0:0:0: [sdc] Attached SCSI removable disk
Sep  5 10:31:00 kernel: sd 1:0:0:0: Attached scsi generic sg0 type 0
The output may vary slightly, but the point here is to see what name the kernel gave the new disk. “sdc” in the example above.
Uncompress the image file:
$ gunzip xillybus.img.gz
Copying the image to the Compact Flash is simply:
# dd if=xillybus.img of=/dev/sdc bs=512
You should point at the disk you found to be the flash drive, of course. Don’t use /dev/sdc unless it happens to match the device you’ve recognized on your computer!
And verify
# cmp xillybus.img /dev/sdc
cmp: EOF on xillybus.img
Note the response: The fact that EOF was reached on the image file means that everything else compared correctly, and that the flash has more space than actually used. If cmp says nothing (which would normally be considered good) it actually means something is wrong. Most likely, a regular file “/dev/sdc” was generated rather than writing to the device.
Then unplug the USB adapter from the computer. This is necessary, since the Linux system may have a false perception of the flash’ partition table, so bad things can happen on attempts to access it.
Generating the bitstream file
The bitstream file is what programs the FPGA itself. First, unzip fpga-xillyblaze.zip or fpga-xillyblaze-v6.zip (the "FPGA bundle" previously downloaded) into anywhere in your hard disk (but do avoid white spaces in the path). Double-click the xillyblaze.xise file in either the "verilog" or "vhdl" subdirectory in this bundle. If you have a preferred HDL language, you'll already know which one to pick, and if not, it doesn't really matter which one (but the screenshots below match the "verilog" choice).
Assuming that you've installed Xilinx ISE properly, double-clicking this file will open Xilinx' Project Navigator, with a window having an upper left corner looking more or less like this:
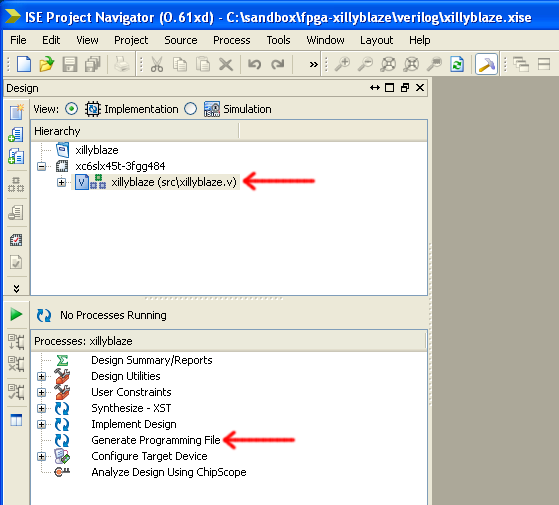
The upper red arrow points at the toplevel module, xillyblaze, which should be selected (it's most likely by default). If you chose to work from the "vhdl" directory, the source row will look slightly different, but the same in essence.
Just double-click "Generate Programming File" pointed at by the lower red arrow. This launches the whole toolchain for generating a bitstream file from the sources. The whole process takes about 20 minutes, depending on your computer's strength.
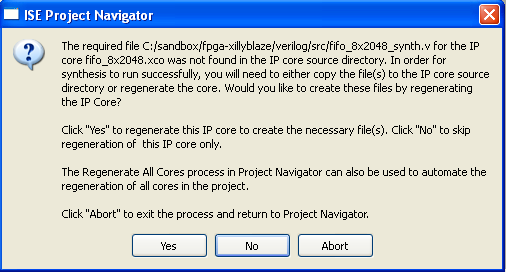
During the implementation, a popup window such as the following will appear twice. Just click "Yes" (both times).
After loads of text output on the log window, the bottom line should be:
Process "Generate Programming File" completed successfully
The output of this entire process is a file named xillyblaze.bit in the verilog/vhdl subdirectory (whichever you chose). A vast number of other files are generated as well, but they can be ignored.
If an error occurs, it's most likely a minor issue, which FPGA engineers know how to work around. If you used an ISE version older than 13.2, that may very well be the reason. If you used a newer version, there shouldn't be any problems, but sometimes bugs in the implementation tools make them crash for no apparent reason. That's why using version 13.2 was recommended.
Generating an ACE file
When the bitstream file at hand, it’s time to make one loadable file, which is a mixture of the bitstream for FPGA logic and the Linux kernel image.
- Verify that a xillyblaze.bit exists in the verilog/vhdl subdirectory of your choice (among a lot of other files).
- Copy genace.tcl to the same directory as xillyblaze.bit from /path/to/ISE_DS/EDK/data/xmd/ (/path/to leading to where you installed Xilinx ISE)
- Generate xillybus.ace (note that it’s xillybus.ace) with the following command in a DOS Window. Change the working directory to where xillyblaze.bit and genace.tcl are, and go
\path\to\ISE_DS\EDK\bin\nt\xmd -tcl genace.tcl -hw xillyblaze.bit -elf ../linuxkernel/simpleImage.xillybus -ace xillybus.ace -board sp605 -target mdm
when targeting the SP605 board, or
\path\to\ISE_DS\EDK\bin\nt\xmd -tcl genace.tcl -hw xillyblaze.bit -elf ../linuxkernel/simpleImage.xillybus_v6 -ace xillybus.ace -board ml605 -target mdm
when targeting ML605.
This holds for Windows, of course. Linux users use a shell prompt and forward slashes instead of backslashes, and locate the xmd executable according to their installation.
This utility creates plenty of output to user console (and also quite a few files) but the bottom line should be
SystemACE file 'xillybus.ace' created successfully
If a problem occurs, the most common reason is that one of the required files (simpleImage.xillybus, xillyblaze.bit and genace.tcl) didn’t exist or weren’t copied to the right place.
Copying the ACE file to flash
This last step is pretty straightforward. If you haven’t done so since loading the image, unplug the USB adapter. Then plug it in again, so the computer has a fresh view of the flash.
There are three partitions on the flash device: The first one is a FAT16, to which xillybus.ace should be copied, and the two others are native Linux ext2 partitions. There is already a file in the destination partition, copyhere.txt, so xillybus.ace should be copied to be in the same directory. copyhere.txt can be left there or deleted. It has no functional significance.
Windows will most likely ignore the two Linux partitions, so it boils down to plugging in the USB adapter and copy xillybus.ace to what is presented as flash drive. Mind you, the partition seen is slightly less than 50 MB.
On Linux systems, mount the first partition (e.g. /dev/sdc1) and verify that copyhere.txt is there. Computers with automount are likely to mount all three partitions. Please make sure to unmount all three before unplugging the USB adapter.
That’s it!
Plug the CompactFlash into the SP605 board, and prepare yourself for a power-on!
Next recommended reading: Powering up the SP605/ML605 board